POS Terminal
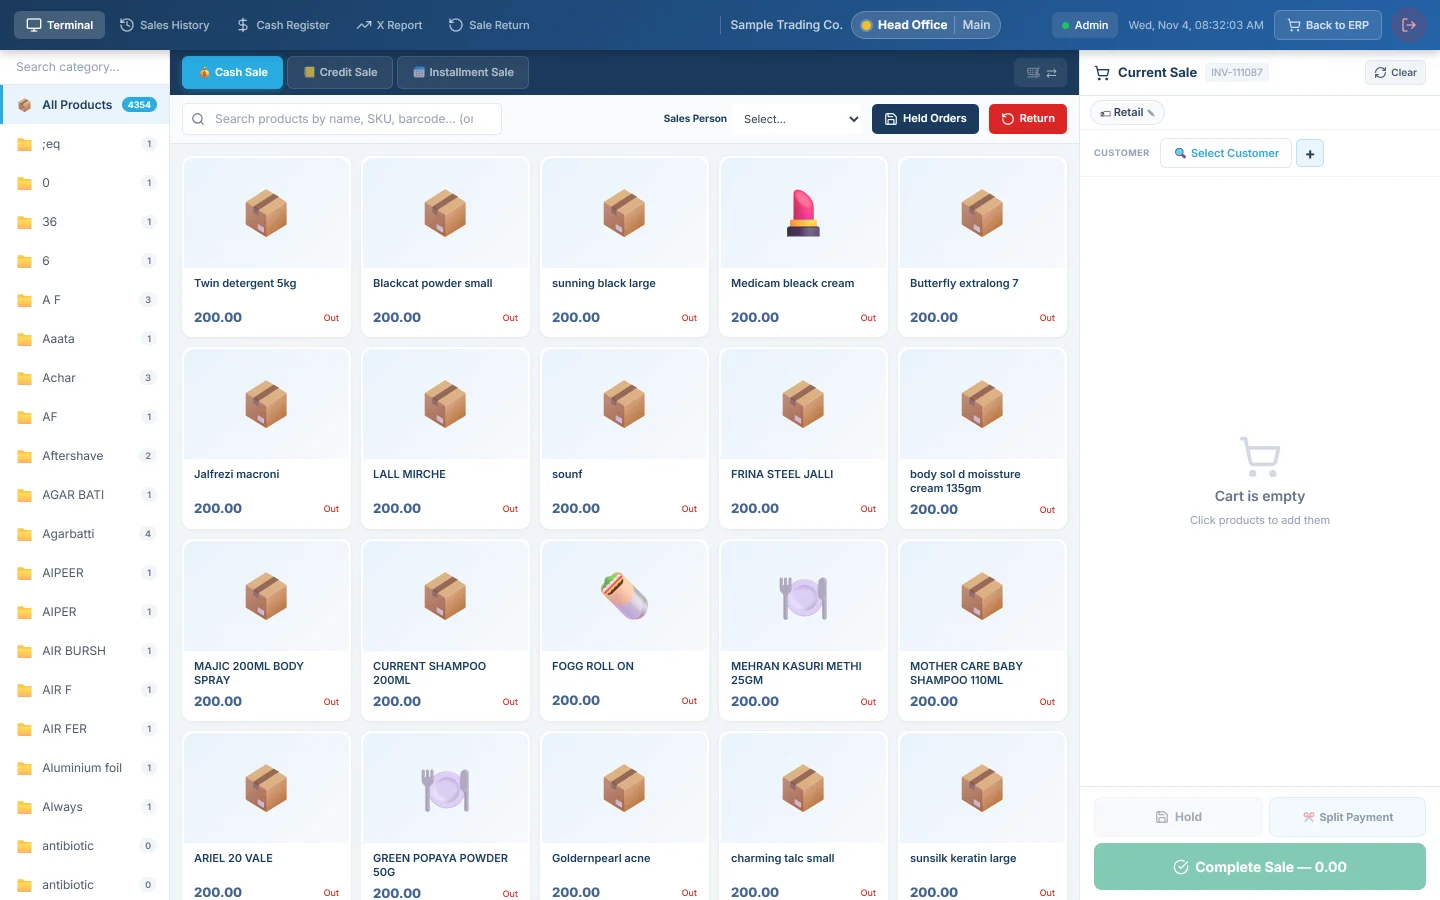
The till screen: scan or tap products, take a cash, credit or installment sale, hold a bill, start a return and print the receipt.
The POS Terminal is the till screen in EloERP: products on the left, the current bill on the right. Every sale you complete becomes a sales invoice with its payment, linked to the cashier's open shift.
Before you begin
- Your products have a sale price and are set to show on the POS, see All Products.
- The tenders you take (cash, card, bank transfer, wallet) exist as Payment Methods. They become the Method buttons on the bill.
- Your role has Access POS Terminal. Discounts need Apply Per-Line Discount at POS or Apply Invoice-Level Discount at POS. Price changes need Edit Item Price at POS, and returns need Process POS Sale Return. See Users & Roles.
- A cashier whose user has Enable Cash Register ticked must open a shift before the first sale, see Open and close a shift.
- Credit and installment sales need a customer with a ledger, see All Customers.
- The default sale type, negative stock, print preview and register mode are set in POS Settings.
Where to find it
Open Sales → POS → POS Terminal, or click the Open POS quick action at the bottom of the Sales menu. The terminal opens full screen.
The bar across the top has these tabs:
| Tab | What it opens |
|---|---|
| Terminal | This selling screen. |
| Sales History | Sales and returns, with a reprint and a return button on each sale. A cashier on a shift sees their own shift. |
| Cash Register | Your shift: opening balance, cash in, cash out and close. See Cash Register. |
| X Report | The shift so far, shown only if your role can see it. See X-Report (Mid-Shift). |
| Sale Return | The return screen, shown only if your role can take returns. |
Back to ERP takes you back to the normal menus. Outlets whose POS Type is Game Zone also get a Gaming tab, see Gaming Zone.
The screen
| Part | What it does |
|---|---|
| Category list (left) | All Products or one category. Type in Search category... to find one. |
| Sale type | Cash Sale, Credit Sale or Installment Sale. With the hotel module there is also Charge to Room. |
| Search bar | Type a name, SKU or barcode, or scan. Press Enter to add an exact barcode or SKU match. |
| Sales Person | Credits the sale to a salesman for commission and the staff report. |
| Held Orders | Bills you parked with Hold. The badge shows how many. |
| Return | Opens the sale return screen. |
| Product tiles | Price, stock left and badges such as Out, Happy Hour or an age limit. Click a tile to add it. |
| Current Sale (right) | The bill number, the customer, each line, the totals, Method, Cash Tendered and Change. |
| Buttons | Hold, Split Payment and Complete Sale with the total on it. |
Keyboard shortcuts
| Key | What it does |
|---|---|
| F2 | Puts the cursor in the product search box. |
| Enter (in search) | Adds the product whose barcode or SKU you typed or scanned. |
| Esc (in search) | Clears the search box. |
| F12 | Completes the sale, the same as Complete Sale. Works only when the bill has items. |
| Esc | Closes the open panel, such as Held Orders or the customer window. |
Take a cash sale
- Scan the items or click their tiles.
- Check the quantities on the bill.
- Pick the Method, for example Cash.
- Type the cash you received in Cash Tendered. Change shows what to give back.
- Click Complete Sale or press F12.
For discounts, scanning tips and split payments, see Take a cash sale at the till.
Sell on credit
- Click Select Customer, search by name, phone or email and click the customer. + New adds one without leaving the till.
- Click Credit Sale. Without a customer, EloERP asks you to pick one first. A customer without a ledger cannot buy on credit.
- Add the items.
- If the customer pays something now, type it in Down Payment and pick the Method. Tick Full to take the whole amount.
- Check Balance Due: this is what goes on the customer's account.
- Click Complete Sale.
The balance shows in the customer's ledger, see Customer Ledgers.
Sell on installments
- Add the items and select the customer.
- Click Installment Sale. The Installment Plan window opens; close it with × if you still need to enter the down payment.
- Type the Down Payment on the bill.
- Click Create Installment Plan.
- Set Interest Type and Interest Value if you charge interest.
- Pick the number of installments under # Installments:, the Frequency and the Start Date of the first one.
- To change single amounts or dates, tick Custom schedule (edit amounts / dates). The rows must add up to the Balance.
- Add guarantors or cheques if you take them, then click Save Plan.
- Click Complete Sale. It stays greyed out until the plan is saved.
Once saved, the button reads ✓ Installment Plan Ready — View and the bill is locked. To change the items, click Delete Plan & Edit Cart, edit, and save the plan again. The counts and frequencies you can choose come from your installment settings, see Installment Plans.
Hold, return and shift
- Hold parks the bill so you can serve the next customer. Held Orders brings it back. See Hold and recall a sale.
- Return opens the sale return screen for goods coming back. See Take a return at the till.
- The shift is opened on the Open Cash Register screen and closed from Cash Register or X Report. See Open and close a shift.
Print the receipt
After Complete Sale, the Sale Complete ✓ window shows the receipt.
- It prints by itself, unless Show Print Preview is on in POS Settings.
- Print Receipt prints it again; Print Preview shows it first.
- SMS Receipt appears when the customer has a phone number.
- New Sale closes the window. The bill is already empty and ready.
The number of copies comes from Number of Prints in POS Settings or the invoice copies in Print Settings. To reprint an older sale, open Sales History and click the printer icon on its row. A receipt can only be printed after the sale is saved.
What happens in the books
When you complete a sale, EloERP saves a sales invoice and posts it:
- The customer's ledger is debited with the Grand Total. A walk-in sale, or a customer without a ledger, debits the account of the payment method instead, such as Cash in Hand.
- Sales Revenue is credited with the goods, tax goes to Sales Tax Payable, and discounts go to Discount Allowed.
- Stock items leave the warehouse, and their cost moves from Inventory to Cost of Goods Sold.
- Money taken now, including a down payment, posts a receipt: the payment method's account is debited and the customer is credited.
- An installment sale also creates the installment plan for the balance.
The sale is linked to your open shift, so its cash adds to Expected Cash on the X-Report.
Common questions
Complete Sale says "⚠ Sale NOT saved." The server refused the sale, for example for stock or permissions. The message gives the reason and your bill is kept; fix it and click Complete Sale again.
An item says Insufficient stock. Allow Negative Stock is off in POS Settings and the warehouse has less than you are selling. Receive the stock first, or ask a manager to change the setting.
Credit Sale says the customer has no ledger. Credit and installment sales post to the customer's own account. Turn on the ledger for that customer in All Customers.
Where is the Register picker? It shows only when POS Settings uses Shared Register. Under Shift-Locked (Default) every sale goes to the shift you opened.
The screen says Session Locked. The till locks after 15 minutes without use and warns you two minutes before. Click Resume Session; the bill is kept.
Can I sell when the internet is down? Not in the browser. The offline till, the POS app on a counter PC, keeps selling and sends its sales later. See The offline till: what it is and when to use it.
谢谢。 如果仍需帮助,请发邮件至 info@eloerp.net。