Employees
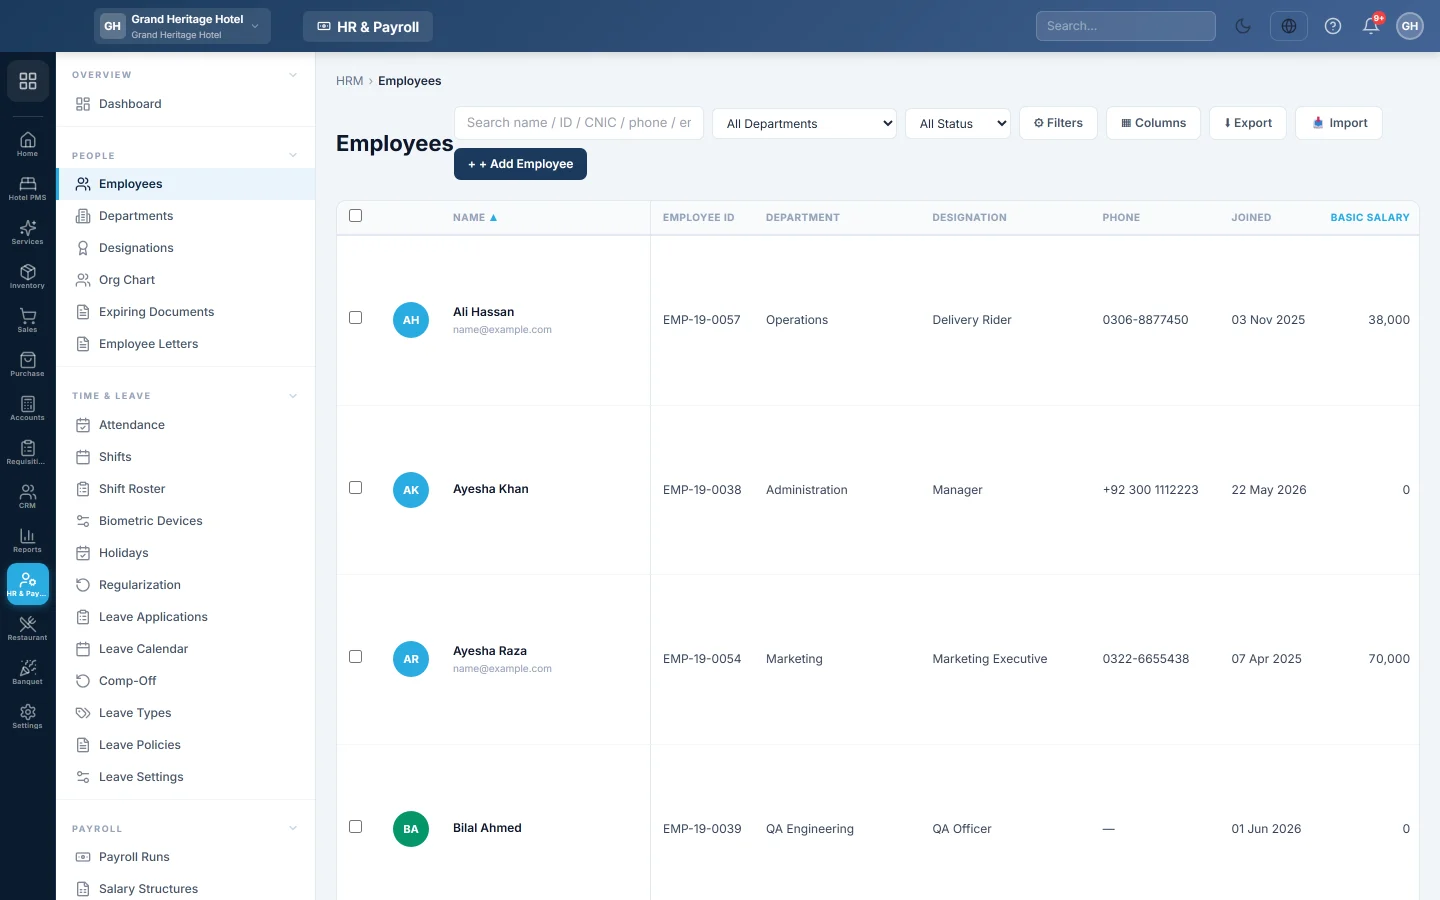
Add, find, import and update employees, and record a separation, final settlement or salary certificate from the employee list.
The Employees page is the list of everyone you employ. Each employee record holds their personal details, job, salary, bank account and ledger, and everything else in HR & Payroll reads from it.
Before you begin
- Create your Departments and Designations. An import creates missing ones for you.
- To pay salaries in another currency, set up that currency first.
- Your role needs the HR permissions to view and manage employees. See Users & Roles.
Where to find it
Open HR & Payroll → People → Employees.
Find an employee
- Type a name, employee ID, CNIC, phone or email in the search box.
- Pick a department in All Departments or a status in All Status.
- For more, click Filters. Choose Designation, Branch, Employment type, Contract type, Gender, a joining date range or a salary range.
- Under Missing data, tick a box to find records with no bank details, no CNIC, no phone, no email or no salary.
- Click Apply. Clear all removes every filter.
Click Columns to choose which columns the list shows. Click Export to download the list.
Add an employee
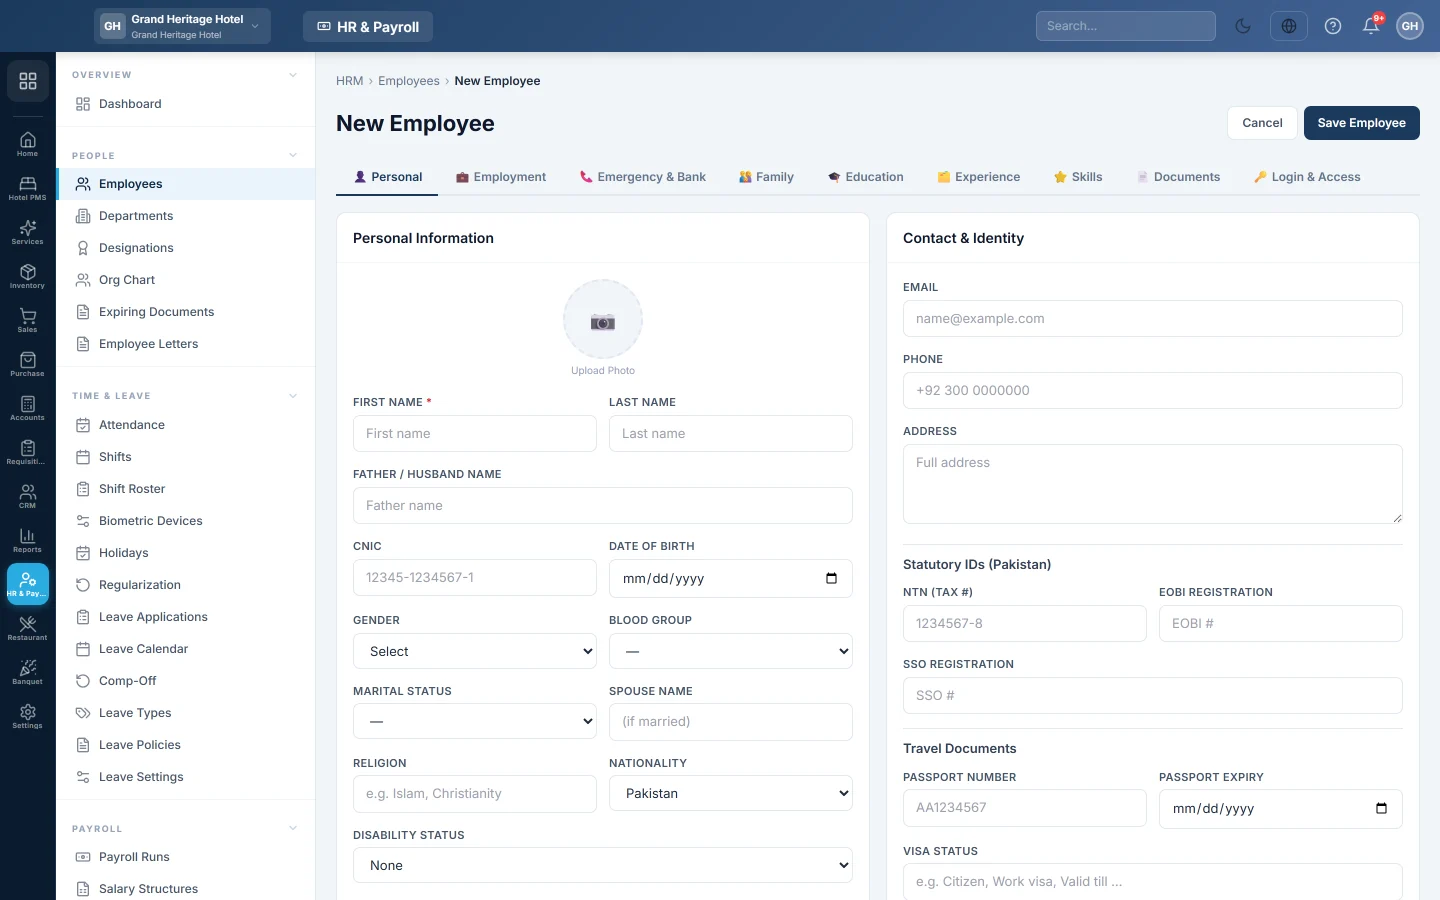
- Click Add Employee.
- On the Personal tab, fill the name, CNIC, gender, date of birth and contact details. Under Statutory IDs (Pakistan), enter the NTN (tax #) and EOBI # if you have them.
- On the Employment tab, pick the Department, Designation and Branch. Fill the Joining Date, Employment Type and Status. The Employee ID is created by itself.
- Under Salary, enter the Basic Salary and Allowances, and choose whether Overtime is allowed.
- Under Ledger & Opening Balance, keep Create GL ledger for this employee ticked. Enter an Opening Balance only if the employee already owes you money (Debit — employee owes us (e.g. advance)) or you owe them (Credit — we owe employee).
- On the Emergency & Bank tab, enter the emergency contact and the Bank Name, Account Number and IBAN. These print on bank transfer files and payslips.
- Click Save Employee.
After the first save, the other tabs open up: Family, Education, Experience, Skills, Documents and Login & Access. On Employment you can also assign a salary structure from a date, under Salary Structure Timeline.
Give an employee a self-service login
- Open the employee and go to the Login & Access tab.
- Type the Sign-in email and a password, then confirm it.
- Click Create self-service login.
The employee can then sign in and see only their own payslips, attendance, leave and profile.
Import employees from a spreadsheet
- Click Import.
- Click Download template (CSV) and fill one row per employee. Only name is required. Missing departments and designations are created.
- If the file has opening balances, set Opening balances as of and the Opening balance offset account.
- Under Upload CSV file, choose the file and click Import.
- Read the result: how many rows were imported and how many were skipped.
Change many employees at once
- Tick the employees in the list. Select all picks every employee that matches the filters.
- Click Bulk edit.
- Tick only the fields to change, such as Department, Branch, Status, Probation ends, Basic salary or bank details, and fill them.
- Click Update. Every other field stays as it is.
Actions on an employee's row
| Button | What it does |
|---|---|
| Edit | Opens the employee record. |
| Confirm | Shown during probation. Confirms the employee after probation. |
| Separate | Records a resignation, termination, retirement or end of contract. |
| Reinstate | Shown on inactive or terminated employees. Brings them back as staff. |
| Cert | Prints the annual salary certificate, with earnings, income tax withheld and EOBI. |
| Settle | Works out and posts the full and final settlement. |
| Del | Deletes the employee. This cannot be undone. |
Record a separation
- Click Separate on the employee's row.
- Choose the SEPARATION TYPE: Resignation, Termination, Retirement, End of contract or Other.
- Set the LAST WORKING DAY. Payroll uses it to prorate the last salary.
- Optional: type a REASON.
- Click Record Separation.
Post a full and final settlement
- Click Settle on the employee's row.
- Check the LAST WORKING DAY.
- Review the Earnings: Pro-rated salary, Leave encashment, Gratuity and Other earnings.
- Review the Recoveries: loans, advances and other deductions still owed.
- Check the Net payable, add NOTES if you like, and click Post to Accounts.
What happens in the books
- Create GL ledger for this employee gives the employee their own ledger. Salary, payments, loans and advances all post there, so it reads as a complete statement. See Ledger Statement.
- An opening balance is posted on the date you give: a debit when the employee owes you, a credit when you owe them.
- A full and final settlement debits Salary Expense (salary, leave encashment and other earnings) and Gratuity Expense. It credits the employee's ledger, or Salaries Payable, with the net payable. Loans, advances and other recoveries are credited to the accounts they were raised on.
Common questions
Why can I not change the opening balance? It is locked once the employee has payroll or loan activity. Reverse those first.
What is the difference between Status Inactive and Separate? Separate records the exit type and last working day, which payroll and the final settlement use. Changing the status alone does not.
Can I rehire someone who left? Yes. Click Reinstate on their row.
Where do I set the salary for payroll? On the Employment tab: Basic Salary and Allowances, or a salary structure. Which one payroll uses depends on Statutory & Tax Slabs.
How do I record a yearly raise? Use Increments. It keeps the history and prints the letter.
Terima kasih. Jika masih butuh bantuan, kirim email ke info@eloerp.net.