Floor Plan
Draw each dining room to scale with tables, furniture and walls, then run the live Floor Board to see which tables are free, busy, billed or being cleaned, and seat or move guests.
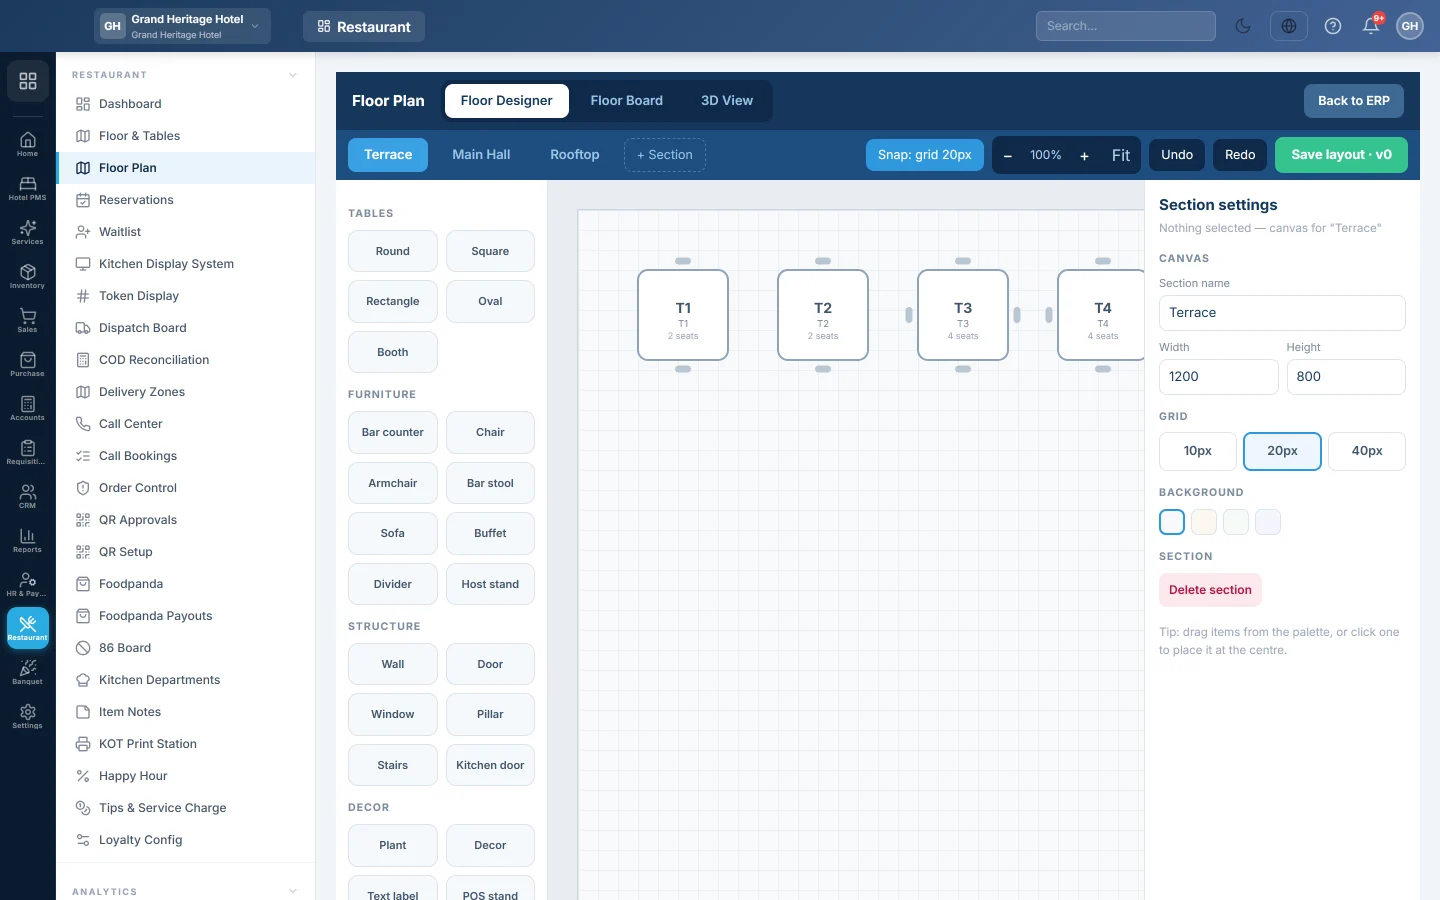
Floor Plan has two parts. The Floor Designer draws each dining room with its tables and furniture. The Floor Board shows the same room live, coloured by each table's state, so a host or manager can seat guests and move parties.
Before you begin
- Switch to the right branch in the top bar. Each branch has its own sections.
- To view it your role needs View Floor & Tables. To draw and save a layout it needs Create Floor & Tables or Edit Floor & Tables, and to delete a section Delete Floor & Tables. To seat, move, merge or block tables on the board it needs Manage Waiter-Table Assignments, which covers the layout too. See Users & Roles.
- Tables you already added on Floor & Tables appear here, each in its own spot.
Where to find it
Open Restaurant → Restaurant → Floor Plan. It opens full screen. Use the tabs at the top to switch between Floor Designer and Floor Board, and Back to ERP to leave. 3D View is not available yet.
Draw a room
- Click Floor Designer.
- Pick the section's tab, or click + Section for a new room.
- With nothing selected, the right panel shows Section settings. Type the Section name and set the Width, Height, Grid and Background.
- From the left palette, drag a table (Round, Square, Rectangle, Oval or Booth) onto the canvas, or click it to drop it in the centre. Each new table gets the next number, such as T5.
- Add Furniture, Structure (walls, doors, windows, pillars, stairs, kitchen door) and Decor the same way.
- Click a table and set its Number, Seats and Name (optional) in the right panel. You can change its Shape there too.
- Drag items to move them. Drag a corner handle to resize, and the round handle on top to rotate.
- Click Save layout. A message confirms the saved version.
Designer shortcuts
| Key or button | What it does |
|---|---|
| Snap: grid | Turns snapping to the grid on or off. |
| −, +, Fit | Zoom out, zoom in, fit the room on screen. The mouse wheel zooms too. |
| Undo, Redo | Undo or redo your last changes (Ctrl+Z, Ctrl+Y). |
| Ctrl+D | Duplicates the selected items. |
| Delete | Removes the selected items. A table with an open order is kept. |
| Arrow keys | Move the selection one grid step; with Shift, one pixel. |
| Shift+click, or drag on empty canvas | Selects several items. |
| Alt+drag | Moves the view around. |
Bring front and Send back set which item sits on top.
Run the Floor Board
- Click Floor Board.
- Pick the section's tab.
The board reloads every 6 seconds. The legend shows each colour:
| State | Meaning |
|---|---|
| Available | Free to seat. Shows the seat count. |
| Occupied | An order is open. Shows minutes since seating, guests, the running total, how many items are served and the waiter's initials. The time turns red after 45 minutes. A dot shows the kitchen: grey waiting, amber cooking, green ready. |
| Bill printed | The bill has gone to the table. |
| Reserved | Held for a booking. |
| Dirty / Cleaning | Waiting for, or being, cleared and reset. |
| Blocked | Out of service. |
Click a table to open its panel and act on it:
| Table state | What you can do |
|---|---|
| Available | Open new order…: enter Guests, pick the Waiter, then Create order → open in POS. The till opens with the new order loaded. Or Block table (out of service). |
| Occupied | Resume order in POS opens the till on this table's order. Also Mark bill printed, Transfer to another table… or Merge with another table…. A merged table shows Unmerge tables as well. |
| Bill printed | Settle in POS opens the till on the order to take payment. |
| Reserved | Seat party → open order… |
| Dirty | Start cleaning |
| Cleaning | Mark cleaned → available |
| Blocked | Unblock → available |
Move a party to another table
- Click the occupied table.
- Click Transfer to another table….
- Tap a free table. Click Cancel on the banner to stop.
The order moves to the new table, and the old table turns Dirty so it gets cleared.
Join two tables for one party
- Click the occupied table.
- Click Merge with another table….
- Tap the second table.
The second table is held: it shows as Occupied with With T… and the number of the first table. Both tables open the same order. Click either table and then Unmerge tables to separate them. Paying the bill releases the merge by itself.
Common questions
I created an order on the board but the till is empty. Create order → open in POS and Resume order in POS open the till with that order loaded. If you see an empty bill, click Open on the till and pick the order for that table. See POS Terminal.
A table shows Occupied but nobody is there. The board shows a table as occupied only while an order is open on it. Settle or cancel that order in the till. If the order was already settled, the board shows the table free.
Can I delete a table that has an order? No. It stays on the canvas until its order is settled.
What happens when I delete a section in the designer? Its furniture and its free tables are deleted with it. A section with occupied tables cannot be deleted, and you must keep at least one section.
Does Merge hold the second table? Yes. The second table turns Occupied and shows With T… until you click Unmerge tables or the bill is paid.
谢谢。 如果仍需帮助,请发邮件至 info@eloerp.net。