Online Store
Set up and open your own online store on your products, stock and prices, and choose its look, delivery charges, ways to pay and policies.
The Online Store page is where you build your own store on the web. It sells the products, stock and prices already in EloERP, and its orders arrive in Orders like any other online order.
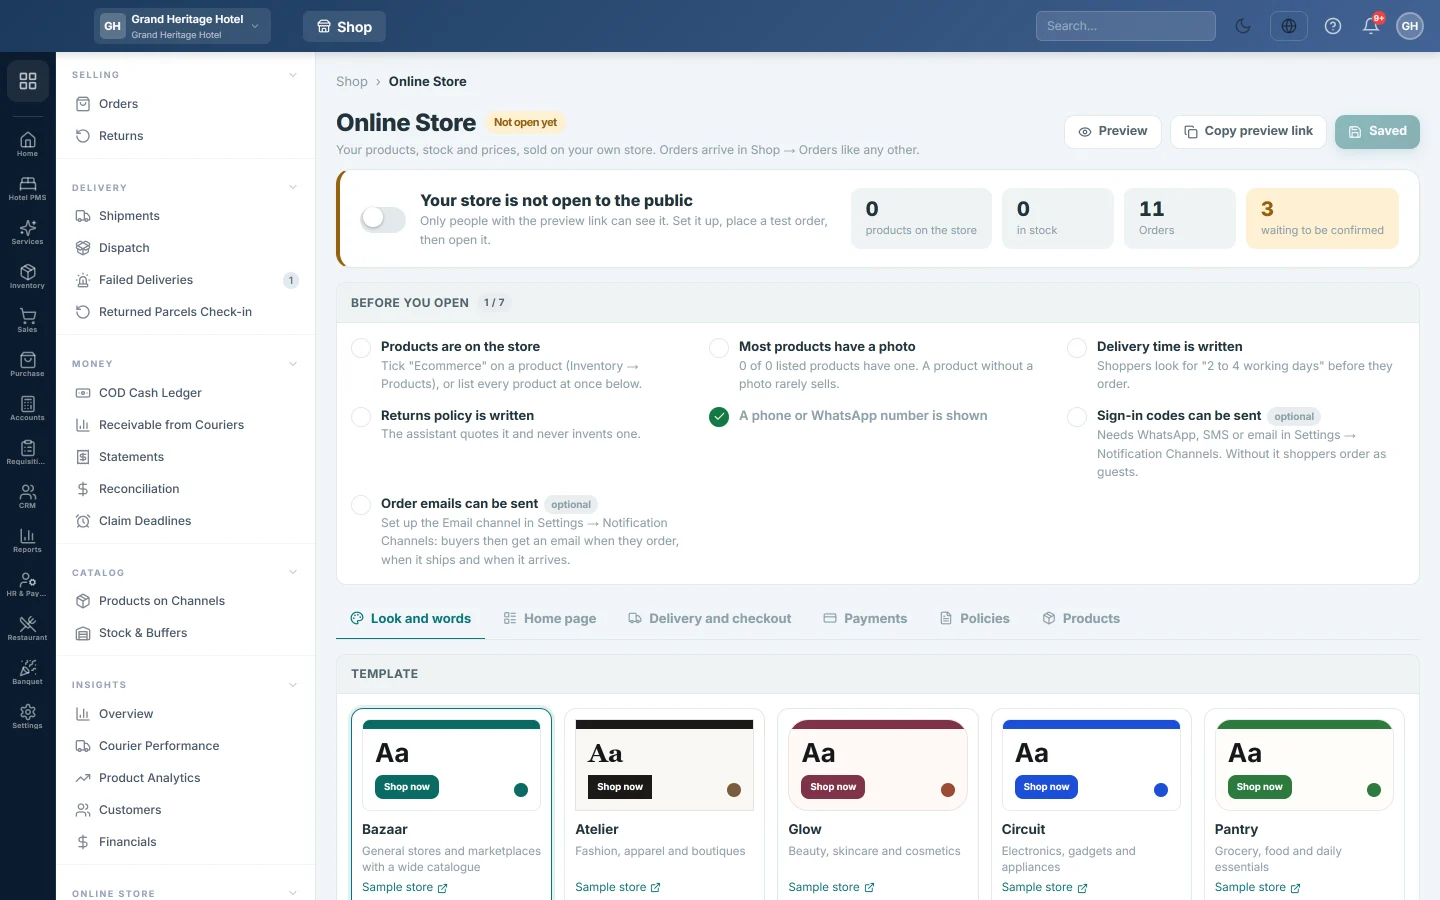
Before you begin
- The online store must be switched on for your company by your service provider. Until then the page says The online store is not part of this plan yet and the Online Store menu section is hidden.
- Only a company administrator can open this page and the other pages in the Online Store section.
- Your products need a sale price, stock in the head office and, ideally, a photo. See All Products.
- Sign-in codes and order emails need a WhatsApp, SMS or Email channel. See Notification Channels.
Where to find it
Open Online shop → Online Store → Online Store.
Read the top of the page
- The pill next to the title says Not open yet or Open to the public.
- The switch turns the store on and off for the public. While it is off, only people with the preview link can see the store.
- The counts show products on the store, in stock, orders and waiting to be confirmed. Click the last one to open the order list.
- Preview opens the store in a new tab, even before it is open. Copy preview link copies a link you can send to a colleague; it works for 24 hours. Once the store is open, the button becomes Copy store link.
- Save changes saves everything on all the tabs. It shows Saved when nothing has changed.
Work through the checklist
The Before you open box lists what still stands between your store and a shopper who can order. It disappears when every required item is done.
| Item | What to do |
|---|---|
| Products are on the store | Tick Ecommerce on products, or choose Every product I sell on the Products tab. |
| Most products have a photo | Add photos to products. Six out of ten listed products need one. |
| Delivery time is written | Fill in Delivery time, as you would say it on the Delivery and checkout tab. |
| Returns policy is written | Fill in Returns and exchange on the Policies tab. |
| A phone or WhatsApp number is shown | Add a phone to the company profile, or the WhatsApp number on the Look and words tab. |
| Sign-in codes can be sent (optional) | Set up a WhatsApp, SMS or Email channel. Without one, shoppers order as guests. |
| Order emails can be sent (optional) | Set up the Email channel. |
Choose the look and the words
On the Look and words tab:
- Under Template, click the template that suits your shop, for example Atelier for fashion, Circuit for electronics or Pantry for grocery. There are 15.
- Under a template, Sample store shows it with sample goods, and With my products shows it with yours.
- Optionally pick an Accent colour for buttons and highlights. Click Reset to go back to the template's own.
- Under Light or dark, choose Light, Dark or Follow the phone.
- Fill in the Store name (empty uses your company name), Tagline, Announcement bar, Big headline, Line under it and Button text.
- Type the WhatsApp number shown on the store.
- Click Save changes.
Arrange the home page
The Home page tab lists the home page sections from top to bottom. Until you change something, the page follows the template's own layout.
- Use the up and down arrows to move a section, and X to remove it.
- Change a section's Layout or Heading. For a Products row, choose what it Shows and How many.
- Under Add a section:, click a section to add it at the bottom, for example Opening banner, Categories, Products, Promises or Your usual (reorder).
- Click Save changes, then Preview to see the page.
Click Back to the template's to throw your layout away. The header, cart, checkout and footer always stay where they are.
Set delivery and checkout
On the Delivery and checkout tab:
- Enter the Delivery charge, Free delivery on orders over (0 = never free) and Delivery time, as you would say it, for example 2 to 4 working days.
- To charge some cities differently, click Add a city and enter the city and its charge. Tick Deliver only to the cities listed above to refuse orders for any other city.
- To offer Express or Same day, click Add a way to deliver and fill in its name, charge, free-over amount, timing and, optionally, its cities.
- Under Checkout, set Take cash on delivery, Biggest cash-on-delivery order, Smallest order you take and Order number starts with (WEB unless you change it).
- Tick the options you want, such as Let people order without signing in, Ask the buyer to confirm a cash-on-delivery order from their phone, Let shoppers collect from the shop and Keep selling when a product runs out.
- Click Save changes.
Take payments
The Payments tab sets cash on delivery, bank transfer, and the card and wallet gateways. See Take card and wallet payments.
Write your policies
On the Policies tab, write Delivery, Returns and exchange and Payment in your own words. Under Questions customers ask, click Add a question for each question and its answer. Under Size charts, click Add a size chart, tick its categories and fill in the rows.
The store shows these texts, and the shopping assistant answers only from them.
Let trade customers order on account
The Trade ordering tab is for distributors and wholesalers. It is off until you tick Let trade customers order on account. With it on, the customers you allow sign in, see their own prices and order on account, and each order arrives as a Sales Order waiting for your approval. You also choose Who sees prices on the store: Everyone, Anyone who signs in or Trade customers only.
When prices are for signed-in or trade customers only, the top of the page says Your feeds are paused while prices are for signed-in or trade customers only. See Wholesale trade ordering.
Choose which products are on the store
On the Products tab, choose one:
- Only the products I tick: a product is on the store when Ecommerce is ticked on it in Inventory → Products.
- Every product I sell: every active, priced, saleable product of the head office is listed.
The store always shows the price and stock in EloERP at that moment.
Open the store
Turn on the switch at the top, then click Save changes. See Open your online store for the steps in order.
Common questions
It says there is nothing to sell yet when I open the store. No product is listed. Tick Ecommerce on some products, or choose Every product I sell, then open it.
Where do the store's orders go? To Orders, on the channel Online Store, numbered with your Order number starts with prefix.
A product is missing from the store. It must be active, saleable, priced and in the head office. It also needs Ecommerce ticked, unless you list every product.
Can I try another template without changing my store? Yes. Click With my products under the template. It opens a preview; your store keeps its template until you save.
Shoppers cannot sign in. Sign-in codes need a WhatsApp, SMS or Email channel. Until you have one, keep Let people order without signing in on.
Спасибо. Если помощь всё ещё нужна, напишите на info@eloerp.net.